- By Profab /
- April 10, 2026
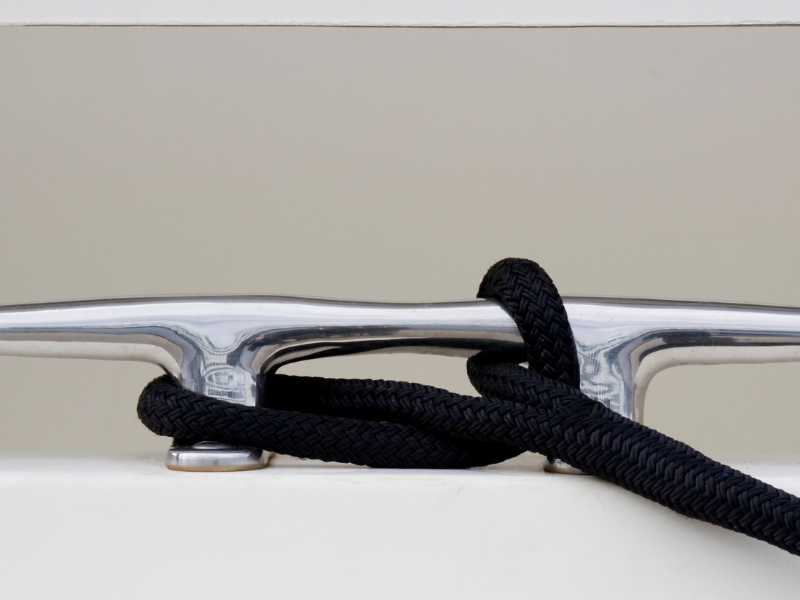
Table of Contents
Pull a failed cleat off a fiberglass deck and look at what actually let go. Most of the time, it is not the cleat. The horns are still sound, the body is intact, and the bolts may still be whole. What gave way is the deck laminate around the fastener holes, where the load was concentrated into too little area. The cleat was adequate. The mounting was not.
That is where a backing plate comes in. It is out of sight once the job is done, so it often gets less attention than the hardware on deck. In practice, though, the holding power of a mooring cleat depends heavily on what is backing it up underneath. Here is what backing plates do, which materials hold up best aboard real boats, and how to size and install them properly.
Why a Cleat Without a Backing Plate Is Half an Installation
A mooring cleat transfers load through its fasteners into the deck. Without a backing plate, that load is concentrated at the bolt holes. Two standard 5/16-inch through-bolts with flat washers under the nuts give you less than 1 square inch of bearing surface on the underside of the deck. That is all the area resisting pull-out under surge load.
Add a 3 x 6-inch backing plate and the bearing surface becomes 18 square inches, more than eighteen times the area carrying the same load. Instead of hammering one small part of the laminate, the load spreads across the plate and into a much larger section of fiberglass.
That is not a small gain. It is the difference between a cleat that tears out in a blow and one that stays where it belongs. BoatUS Foundation tensile testing found that 57% of cleat assembly failures were fastener failures, which means the area around the bolt holes let go before the cleat body did. A backing plate addresses exactly that problem.
What a backing plate actually does:
- Spreads point load at the bolt holes into area load across the deck
- Prevents fastener pull-through in fiberglass, cored, and plywood decks
- Stiffens the deck locally under repeated mooring loads
- Gives nuts and washers a solid, even bearing surface even when the deck has some curvature
Material Options: What Works and What Does Not
Four materials are commonly used for backing plates in marine work, and each has trade-offs that matter depending on access, location, and expected load.
G10 Fiberglass Board
G10 is usually the first choice for experienced riggers on most backing plate jobs. It is made from woven glass cloth and epoxy resin, so it is corrosion-proof, stable, and resistant to water absorption. It also does not cold-flow under sustained compressive load, which matters when hardware is torqued down and left in service for years.
Recommended thickness is 3/8 inch to 1/2 inch for primary mooring cleats. G10 can be cut with standard woodworking tools using carbide or fine-tooth blades, and the edges can be tapered so you do not create hard spots against the deck skin. If you are bedding the plate during installation, it also bonds well with epoxy.
Stainless Steel Plate
Stainless steel plate is much stiffer than G10 at the same thickness. Quarter-inch 316 stainless is the standard marine specification. At that section, it offers roughly ten times the stiffness of G10, so it can spread load very effectively even with a smaller footprint. That makes it a strong option where access below deck is tight and plate size has to stay compact.
The downside is shop work. Stainless takes proper metal-cutting tools, and the edges need to be deburred and smoothed so they do not chafe liner material or insulation during installation. With stainless fasteners, galvanic compatibility is straightforward. If the backing plate is aluminum rather than stainless, use Tef-Gel or a similar thread compound.
Aluminum Plate
Marine-grade aluminum, 5086 or 6061 alloy, is lighter than stainless and easier to cut. The catch is galvanic corrosion when it is paired with stainless fasteners. In dry, accessible spaces, that can be managed with anti-corrosion compound. In bilges or other wet areas, aluminum backing plates corrode over time in contact with stainless hardware, and the corrosion products can lock the assembly together, which turns later service into a fight.
Aluminum can work in protected freshwater installations where inspection access is reliable.
Marine Plywood
Plywood is the easiest material to source and can work well enough in dry, protected spaces. It needs to be marine-grade, free of voids, bonded with waterproof glue, and sealed on every face and cut edge with multiple coats of epoxy before installation. Fastener holes should be drilled oversize, filled with epoxy filler, and then re-drilled to final diameter so water does not get into the wood.
Its weak point is moisture. In bilges or areas with regular condensation, plywood backing plates break down over time, lose compressive strength, and let the hardware work loose. For high-load primary mooring cleats, G10 or stainless is the better long-term call.
| Material | Stiffness | Corrosion Resistance | Best Application |
|---|---|---|---|
| G10 Fiberglass | High | Excellent | All primary mooring cleats |
| 316 Stainless Steel | Very High | Excellent | Tight-access locations, maximum load |
| Marine Aluminum | Medium | Fair (with protection) | Freshwater / dry locations |
| Marine Plywood | Medium | Fair (when sealed) | Protected, dry, low-humidity locations |
Sizing the Backing Plate Correctly
A common rule used by marine riggers is that the backing plate should be at least twice the cleat length and half the cleat length wide. For a common 8-inch cleat, that gives 16 x 4 inches. For a 10-inch cleat, 20 x 5 inches. Those figures are the structural ideal. On actual boats, access often decides what you can fit. Hull-deck joints, bulkheads, and liner panels regularly limit the flat underside available near the gunwale. When space is tight, put your extra length in the primary load direction, fore-aft for a bow cleat and athwartships for a midship cleat, before chasing the full formula in every direction.
The reason is simple geometry. The plate has to extend far enough beyond the outermost bolt holes for the compressive load to spread into the laminate without piling up again at the plate edge. If the plate is too small, it behaves more like a large washer than a real load spreader, and the benefit drops off.
If you have room below deck, bigger is better. An oversize plate does not hurt performance, and it can add useful pull-out resistance. Usually the real limitation is access, tight bilges, liners, and deck camber. In those situations, bonding the plate to the underside of the deck with epoxy adhesive as well as through-bolting it can increase the effective bearing area further. Practical Sailor testing found that bonded backing plates can add a disproportionate strength gain compared with unbonded plates of the same size, especially in cored deck construction.
The Cored Deck Problem
Most production fiberglass boats built after the 1970s use sandwich deck construction: an outer fiberglass skin, a core material, balsa, foam, or honeycomb, and an inner skin. It is an efficient way to get stiffness without excess weight, but the core itself is not meant to carry the compressive and shear loads generated by mooring hardware.
Mounting a cleat through a cored deck without treating the core is a common mistake, and the outcome is predictable. The fasteners compress the core, the fitting loosens over time, water gets in through the bolt holes, and then the core starts to rot. On balsa-cored decks, that damage can spread well beyond the footprint of the hardware.
The correct method is to remove the core material in the bolt zone before installing any primary mooring hardware and replace it with solid fiberglass laminate or epoxy filler. Drill the fastener holes, open them up to approximately twice the fastener diameter, pack the cavity with thickened epoxy, let it cure fully, then re-drill to final size. That gives each fastener a solid epoxy column through the core, prevents core compression, and seals off the most common water entry point.
For larger fittings, some riggers cut out and replace a full section of core with a solid glass insert, either precast or laid up in place with biaxial cloth. It takes more labor, but it leaves you with a permanently solid mounting zone and no ongoing concern about the core in that area.
Installation: Getting the Details Right
Once you have the right material and plate size, the result comes down to installation.
Start with the surface. The underside of the deck is rarely flat, especially near curved topsides. Bed the backing plate in marine sealant or thickened epoxy so any gaps between the plate and the inner skin are filled. If the plate is bridging an air gap, the load ends up concentrated at the contact points instead of being spread evenly.
Use through-bolts, not screws. Self-tapping screws are not acceptable for primary mooring cleats, no matter how heavy the cleat looks. Through-bolts with stainless steel Nylock nuts are the right fastener for hardware that sees sustained or shock loading. Flat washers under the nuts add bearing area at the nut face. One point riggers learn quickly: stainless-on-stainless contact can gall during assembly. A 316 bolt run into a 316 Nylock nut can seize hard before you reach final torque. Tef-Gel, Lanocote, or a dedicated anti-seize on the threads is standard shop practice and saves a lot of trouble later.
Sealant needs to go in the right places. Put it under the cleat at deck level, into each fastener hole, and beneath the backing plate. Do not overtighten. If you crush all the sealant out before it cures, you are left with a thin layer that can crack as the deck moves and eventually leak. Bring the hardware up snug, let the sealant begin curing, 48 hours for fast-cure products, 7 days for standard, then take the fasteners to final torque.
Do not rotate the bolt while tightening. Turn the nut only. If you spin the bolt, you can break the sealant bond at the base of the fitting and around the fastener shank, which creates a leak path even when the bedding job looked right.
For stainless boat cleat installations in saltwater service, the full assembly should be 316 stainless throughout: cleat body, fasteners, and, where used, stainless backing plate. Mixing grades, or bringing 304 hardware into a chloride-heavy environment, raises the corrosion risk at the interface.
According to West System’s guidance on cored deck repair, the epoxy-fill method at fastener penetrations is the standard approach for preventing moisture ingress and core degradation in production fiberglass boats. The same logic applies here. The most reliable predictor of cleat assembly performance is the fastener and mounting system, not the cleat alone. A good stainless cleat on a properly sized backing plate with correct through-bolts will outperform a heavier cleat installed with screws and no backing plate in every failure mode.
What Procurement Teams and Distributors Should Know
If you are specifying marine hardware in quantity, backing plate compatibility deserves attention even though it is rarely spelled out in catalog copy.
Backing plate dimensions need to be checked against the access space available on the vessel type being fitted. A 10-inch cleat with a standard 20 x 5-inch backing plate needs a clear run of at least that size on the underside of the deck. On many production powerboats with full liners, that space is not available without cutting the liner, and that changes installation labor in a real way.
Stainless steel backing plates sized to match specific cleat models are available as paired hardware. For higher-volume work where consistency matters, specifying a matched cleat-and-plate combination helps simplify procurement and reduces variation in the field.
Material certifications matter for the backing plate as much as for the cleat when the assembly falls under classification society requirements or owner-driven material standards. Mill test reports for 316 stainless plate are standard for traceability on documented vessel builds.
Profab Machine supplies stainless steel marine hardware, including cleats and custom fabricated components for marine applications, with full material documentation available for procurement requirements.
Send Inquiry Now
Related Resource
